Activities for preschoolers are more advanced than most of the activities marked for toddlers.While a lot of them are learning activities, they don't necessarily have to be.
147K Shares WIZARD’S BREW RECIPE IN PROJECT #3 I used to think science was above the heads of preschool aged children until I became the science parent at my children’s coop preschool and saw just how wrong I was! Some of the best preschool activities are science related. Preschool age children are inquisitive and open-minded, perfect traits for budding young scientists!
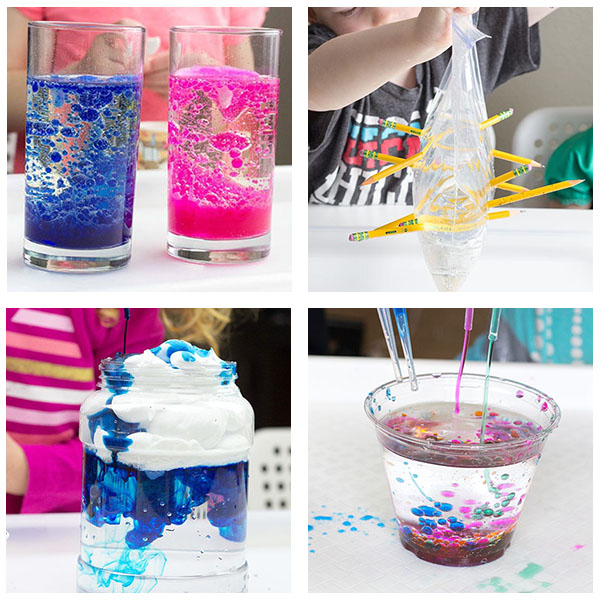
Science at a preschool level is a lot of fun, kids are truly mesmerized by chemical reactions, love exploring nature, and jump to build things. RAINBOW WIZARD’S BREW Ingredients: • Baking Soda • or Food coloring • Glitter • Dishsoap • Vinegar • Glass jar • Small plastic containers • Tray Instructions: Fill the jar halfway with vinegar, then add a few drops of one color of /food coloring and some glitter. Squeeze in some dish soap, stir, and place the jar on a tray. Now have your child add in a heaping teaspoon of baking soda, stir again, and watch the foaming begin! The soap makes it foam rather than fizz. To keep the reaction going continue adding baking soda and vinegar when the foam starts to slow.
To make it change colors, add a tablespoon of vinegar mixed with one color of liquid watercolor/food coloring every so often. Make sure to dump the colored vinegar into the center of the brew. Tip: Stir It! My kids discovered that the more they stirred the mixture the faster and crazier the reaction! Did you hear the screams of delight in the video? Pictured from left: Nature Shadow Boxes, Pinecone BirdFeeders, Magnetic Boxes This was one of our school year’s all time favorites for parents and kids alike.
For the full directions! It will take a few days for the glue to dry but then the box can be hung on the wall like a picture! These can be made with any number of “adhesives” meaning any type of nut butter or in this case Crisco! Fill a clear plastic container with metal objects. We used nuts and bolts, pipe cleaners, bobby pins, brads, and paper clips.
Hand your child a strong magnet and let them experiment with lifting the objects in the container without touching them. It’s magnetic magic! A great tutorial for making these is on. AKA slime made with cornstarch and water. This is so much fun, even for the parents! It is very messy so please do it outside or in an easily cleanable place in your home.
Add colors to the mix for swirling magic! My kids love butterflies! We have made Butterfly Feeders two ways: Nectar Version: Fresh Fruit Version: Supplies: Small paper plate or plastic lid, yarn, over-ripe fruit, orange juice, flowers, tape Instructions: Punch holes near the edges of a small paper plate or plastic lid.
Tie yarn through the holes (have your child feed the yarn through the holes for a fine motor skills bonus), then gather and tie the yarn at the top as if this is a hanging plant. Have your child pick some flowers and tape them to the yarn. Add a piece of fresh fruit in the middle of the plate, pour a little juice on top, and hang in a place where you can see it.

Admittedly it rained the day after we made these at school and our poor feeder was pretty thrashed, so I never saw a butterfly actually visit it. But most of the fun is in the making! Pictured from left: Dancing Spaghetti, Floaters & Sinkers, Shiny Pennies Super simple project you can do with a couple of items from your pantry. Mix water with baking soda in a clear glass or cup, and add a few small pieces of spaghetti to the mix. Then add vinegar. Bubbles will form on the spaghetti and make it “dance.” Another classic experiment.
Fill a large bowl, kiddie pool, or water table with water. Collect a variety of objects that sink and float. Make sure to collect objects that are similar in size but vastly different in density, like a rock and a tennis ball. Ask your child to predict whether the object will sink or float and let them drop it in the water. Have your child classify them into two different stacks, the “Floaters” and the “Sinkers.” Sounds simple but trust me, it’s a hit with preschoolers! SHINY PENNIES This is a classic experiment and one that easily pleases preschoolers. Collect dirty tarnished pennies and have the kids soak them in a bowl of vinegar.
Within a minute the pennies will be instantly “shined”. For an added bonus, rinse some of the pennies in water after the vinegar dip and then compare them to the vinegar only pennies; if you wait an hour the vinegar pennies will start to oxidize and turn green. VARIATION: Experiment with other solutions to shine the pennies. You can try salsa (the acid in tomatoes also acts to clean the pennies), lemon juice, soap and water, and vinegar and see which one works the best.
More Science: Growing things is a very important lesson. I have done two variations on this project, one using cardboard egg cartons and the other using ziploc baggies. Pin code finder. The ziplock bag yields the more interesting visual results and the egg carton version makes plants that are much easier to transfer to soil down the road. • ZIPLOC VERSION: For the ziploc version buy a variety of seeds, beans and corn work well since they are large and easy to pick up.